
Tables are a very useful grid of “cells” which you can think of like a spreadsheet. Cells in a table can help you lay out text and graphics on a page, and in many cases is the only way to align images and text to look the way you want. Here is a simple 2 by 3 cell table.
| row 1, column 1 | row 1, column 2 | row 1, column 3 |
| row 2, column 1 | row 2, column 2 | row 3, column 4 |
Why tables are so useful? They make laying out pages much easier!
The table above was created by using the table toolbar button, as shown below:
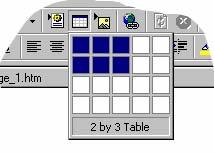
You simply click on the table button and bring your mouse into the creation grid, which will highlight blue as your move your mouse over it. when you let go of the left mouse button the table will be created in your page wherever you last had your cursor flashing.
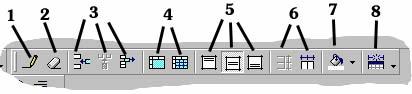
We will use this toolbar throughout the following sections.
To see this toolbar, go to the main menu item View, then to sub menu Toolbars,
and then to "Tables".
Tables are really useful when laying out a front page or just about any page. It is a great way to create columns of text or just keep text in one column at a specific width. Almost all professional sites on the web today have a "hidden" table behind them. To make a table hidden, with the borders not showing to the web surfer, right mouse click anywhere in the table, and then click on Table Properties on the popup menu. This brings up the Table Properties dialog box window as shown below:
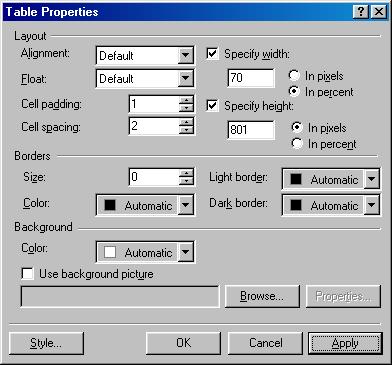
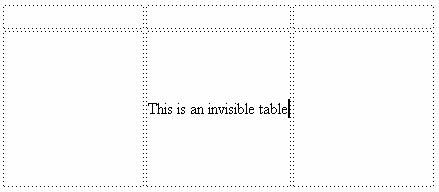
Under the Borders section in the Size field, change the number to 0. This will cause the borders to no longer show when you publish or preview the page, but in the Normal editing mode of FrontPage you will now see a dotted line where the border would usually be. This is done in order to help you see the invisible table while working in it. The image below shows what it looks like in the FrontPage editor:
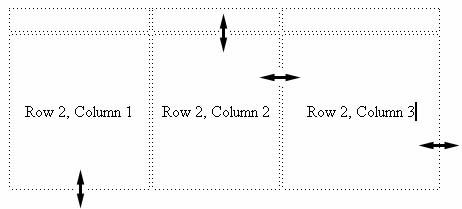
You can easily resize a column or row in a table by using the standard drag and drop mouse technique. The diagram below shows you where to place the mouse pointer to resize columns or rows. When you see the double arrow vertical or horizontal pointers appear, click and hold down the left mouse button, then drag the mouse left or right or up or down in order to size the table. Let go of the mouse button to drop the resized table into place.
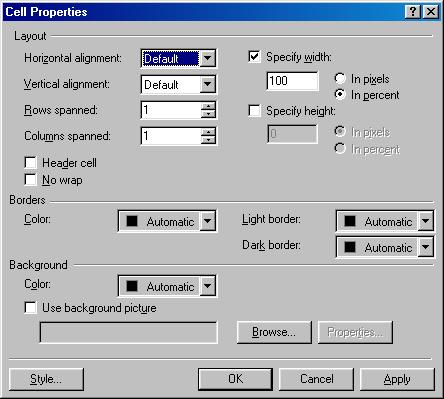
Selecting or highlighting parts of a table can be very time saving. For example, you may wish to apply some effect to only one column. You can select the column and then right mouse click anywhere on the selected area and then bring up the Cell Properties menu. Any change you make in the cell properties dialog box will affect the selected column and all the cells within it.
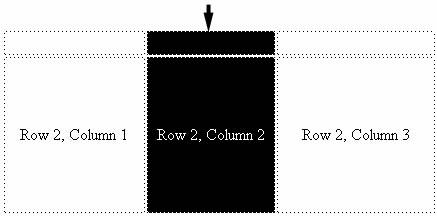
You can select an entire column by clicking your mouse above the table column, as shown below. Wait for the mouse pointer to change to the down arrow before clicking. To select an entire row, move the mouse to the left edge of the table near the row you want to select and wait for the right arrow to appear where the mouse pointer is, then click once with the left mouse button.
You can change the horizontal alignment of a cell so that text is aligned on the left, right, or center of the cell. Likewise, you can change the vertical alignment to make the text start at the top, bottom or center of the cell.
If you want to make a cell into 2 or more cells, simply place your cursor in the cell to split up and then click on the second button in group number 4, as shown in the cut away above. You can also right mouse click in the cell and select "Split Cells..." in the popup menu. This will present you with the following dialog box:
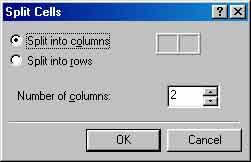
You can split a cell into columns or rows, and you can pick how many cells to create, as shown above.
If you have two or more cells you wish to merge, highlight or select them first. This can be done using the selecting techniques above or by simply dragging your mouse over the cells while hold down the left mouse button. Once the cells are selected, click on the first button in group 4 of the toolbar. You can also right mouse click on the selection and then from the popup menu select "Merge Cells".
You can use the toolbar button number 2 to erase cell lines within your table, but be very careful doing this. If you make a mistake, just use the undo feature (Ctrl-Z).
You can also select the cells you want to delete, or an entire row or column, then right mouse click on it and from the popup menu select the Delete Cells menu item.
Also, the third button in group 3 of the toolbar will become active when you select a cell or range of cells, and if you click on it, it will delete your selected cells.
To align text in a cell, or range of selected cells, use the buttons in group 5 of the toolbar. They will allow you to align text to the top, middle, or bottom of the cell. You can also right mouse click and use the Cell Properties menu to align text.
You may insert columns or rows into a table but placing your cursor in a cell nearby where you wish to do the insert, then click on the first button of group 3 in the toolbar to insert a row, and the second button to insert a column. A more controlled way to do this is to use the Table menu on the main menu of the program, then Insert, and then "Rows or Columns..." which will bring up a dialog box in which you can control more precisely where to insert the rows or columns.
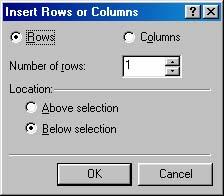
This lets you decide if the row or column should be inserted before or after the current cursor location in the table.
If you wish to make two or more columns or rows the same size, then select the rows or columns and then use buttons in group 6 to do the job.
To quickly paint the background of any cell or selection of cells, use button number 7.
To make a table shrink or grow to fit your table contents (text and graphics), use button number 8. Be careful using this feature because it has a tendency to resize your table in ways you may not wish. There is always the undo (Ctrl-Z) to fix this.
You can create tables within tables to better control content within a cell. This feature is not covered in detail at this time.
Table Tips
You can insert a blank line above a table when the table is the very first thing that is on your page, by pressing Ctrl-Home and then pressing the Enter key.
You do not have to use a table everywhere, but when you need to align things up on a page, an invisible table is often the best way to proceed. Here is an actual example taken from the www.amazon.com web page. This shows the table in its natural invisible mode.
 |
|
|
|
|
|
|
This is a sample layout using an invisible table. Below I show you the same table, but with the border size set to 1. The border size set to 0 causes the table to be invisible, like this one. |
|
|
|
This shows the table with its borders revealed:
|
|
|
|
|
|
|
This is a sample layout using an invisible table. Above I show you the same table, but with the border size set to 0. The border size set to 1 causes the table to be visible, like this one. |
|
|
|
Try creating a table in Notepad and then view it in a web browser. This will be a good exercise to demonstrate why we do not create tables with raw HTML coding methods today when you have available very easy to use and powerful table creation mechanisms in HTML editors.
Sample:
<HTML>
<HEAD>
<TITLE>Dutchess County Real Estate Agents</TITLE>
</HEAD><BODY>
<TABLE border="0" width="50%" cellspacing="1" cellpadding="0">
<TR>
<TD width="10%">WELCOME!</TD>
<TD width="40%"><CENTER>Welcome to the Dutchess County Real Estate Agents Web Site</CENTER></TD>
</TR>
<TR>
<TD width="50%" colspan="2" align="center">TEST THIS OUT</TD>
</TR>
</TABLE>
</BODY>
</HTML>
Here is what the table looks like with the border set to 1 in order to see the cell boundries:
| WELCOME! | |
| TEST THIS OUT | |
<TABLE> </TABLE>
These are the main table defining tags. All other table tags go between these two.
<TR> </TR>
Table Row. This defines a table row.
<TD> </TD> or <TH> </TH>
Table Data. These tags are to be inserted between the <TR> </TR> tags. This allows you to create a cell and put data (text or graphics) into it. The <TH> tag means Table Header and is the same thing as <TD> except the text following the tag will be in bold font.
Create the table above in FrontPage or some other HTML editor. Without knowing all the table tags, and the time needed to enter them in and test the results over and over again in a web browser, it is obviously easier to use an editor to create a table. This is the case with all creations in an HTML editor.
The current HTML documentation on tables can be found at http://www.w3.org/TR/html4/struct/tables.html Read this over some and you start to understand why it is much easier to let the computer program generate table HTML tags for you.
http://www.iomega.com
The table used here shows how you can overlay graphic images between cells.
http://www.directhit.com
This table shows you how you can have smooth graphical corners in a box
http://www.dishnetwork.com/promotions
Shows nicely graphical curved edges.
http://www.imsisoft.com
Cleanly implemented front page table
http://www.dishnetwork.com
This shows how you can have a rounded graphic split into four cells, each
one being a link.
Another Table Sample
| Home | This is a sample of using a table for a main page.... |
| Disk Drives | A Logo can go here... |
| Mice | The body of the page text /
graphics can go here... Note that the links are to the right...
More text here...
|
| Keyboards | |
| Memory | |
| Processors | |
| Cases | |
| Power Supply | |
| Monitors | |
| Video Cards |
Using the table style above can become difficult to maintain for a site because each page will need a copy of this table and the links to the left will need to always be maintained and updated. A better way to handle this, if you do not mind the links at the top of the page, is to use the FrontPage feature Component "Include Page", found the the Insert menu. Inserting an HTML document into each page like this makes it easy to maintain the link section of a site. All you need do it update only one page (which is just a page with the table of links in it) and it will automatically be included on all the pages in your site. Note that this can only be done on sites that host FrontPage webs.
Tables Microsoft's Way (FrontPage 2003)
File, New, right side panel top dropdown menu change to Layout Tables and
Cells (new page)
View, Task Pane (existing page)
Microsoft FrontPage 2003 has some advanced features that allow you to create very nice looking tables, as shown below. This is unique to FrontPage and is not cross compatible with other tools such as DreamWeaver. However, the html and graphics this tool produces is compatible with any tool. It is the tool in FrontPage that creates these kinds of tables that is not compatible.
Table layout is marked with boxes that you normally do not see when designing basic tables in FrontPage. You can add round corners, of any color, as shown below. In addition to this, you can add shadows.
|
|
|||||||||||||||||||||||||||||||
Layout Tables and Cells
Draw Layout Table Icon
Draw Layout Cell Icon
Cell Formatting
Cell Header and Footer
Example of a Cell Layout inside a Table Layout of different dimensions.
|
|||||||||||||||
You can just a "Draw Layout Cell" and apply corners... Or you can first draw a layout table and insert a layout cell within it.
|
|||||||||
|
||||||
The graphics this tool creates will be saved automatically when you press SAVE button. You will be prompted when this happens, and you can just press OK button. You can also change the location of where the images are saved to at this point using the CHANGE FOLDER button.
|
|||||||||
|
|||||||||||
Two Layout Cells within one layout table, with a table inserted on the left side for menu items and the backgrounds set to match the corners. The right layout cell has a single cell table inserted into it with its background also set to match the corner colors.
|
|
||||||||||||||||||||||||||||||||||||||
Increase the surrounding layout table size to apply shadows to the layout cells.
1. Draw Table
2. Draw two cells in the table side by side separated a little
3. Apply corners and colors to each cell layout
4. Create tables within the two cell layouts for your content
5. Adjust table heights to use 100% of the space and change the table borders to
0, and vertical alignment to TOP for the cell on the right side.
6. Change the two inserted table's background color to match your corner and
header/footer colors.
7. Increase the size of the layout table by clicking on it and dragging the
bottom right corner down and to the right slightly.
8. Apply a shadow effect by...
|
|
||||||||||||||||||||||||||||||
Complex Graphical Layouts using tables
Further reading on tables
Using the old fashion way:
http://www.geocities.com/SouthBeach/Sandbar/4926/tables.html
http://www.netpanel.com/articles/internet/tables.htm
Using the FrontPage way:
http://www.courses.dsu.edu/fp97/Default.htm